
One of the most highly rewarding – and extremely difficult – aspects of developing popular and engaging digital products is establishing the product’s personality and art direction. They are deeply interconnected and have the power to invoke deep and  unbridled passion and loyalty amongst a large user base, which will lead to millions of users and extraordinary engagement… or it can cause users to hate your product and never use it again.
Personality is becoming more critical in today’s digital world where voice user interfaces (VUI) and artificial intelligence (AI) are becoming more prevalent, where users may interact solely with a voice (e.g. Amazon’s Alexa) or chatbot. Your product’s success will quickly unfold within the first few minutes a user interacts with your product, so follow the steps below – completing prior to Sprint 0 – to guide your team through the process of crafting a unique product personality and aesthetic.
Step 1: Create the Product Vision
Always always always start a digital product by creating a Product Vision to help guide your team of product managers, designers, marketers, sales, and support folks in making the product a smashing success. It provides a continued purpose in an ever-changing digital world, it will influence the creation of the personality and aesthetic of the product, and help you and your team easily make tough decisions around features, users, or even pivots.
The Product Vision should articulate the product’s raison d’etre, or the purpose of its existence, preferably in one concise sentence. The Product Vision also includes the target audience, audience needs (i.e. what problem are you solving for them?), solutions (i.e. how are you solving the problem?), success factors, and unique differentiators.
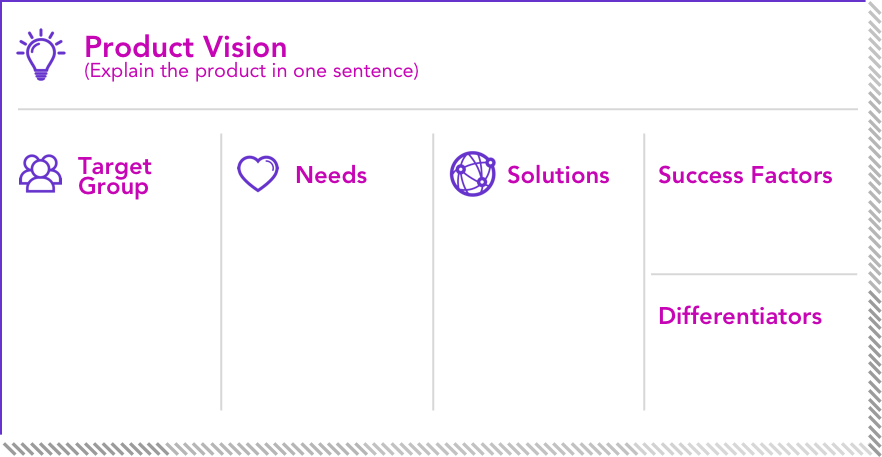
If you’re part of large company, consider fitting the Product Vision within the company’s vision and strategy. If you’re a startup and building a company around your product, you should consider having your company adopt the product’s vision & strategy.
Take plenty of time to craft this vision; talk with stakeholders, customers, partners, designers, and others to get their inputs. Whiteboard ideas. Get mad. Get excited. Get a little crazy! Socialize it with stakeholders before finalizing it so they can help validate it and/or provide valuable input that may spark a few changes.
Step 2: Research and Develop User Personas
The purpose of User Personas is to create reliable and realistic representations of your key audience segments to help guide your team through key product decisions. Your Personas should be based largely on qualitative research, so get off your butts and go talk with your users! You can also gain insight into users with quantitative user research via surveys, analytics, etc., but it’s preferable that you talk with users directly.
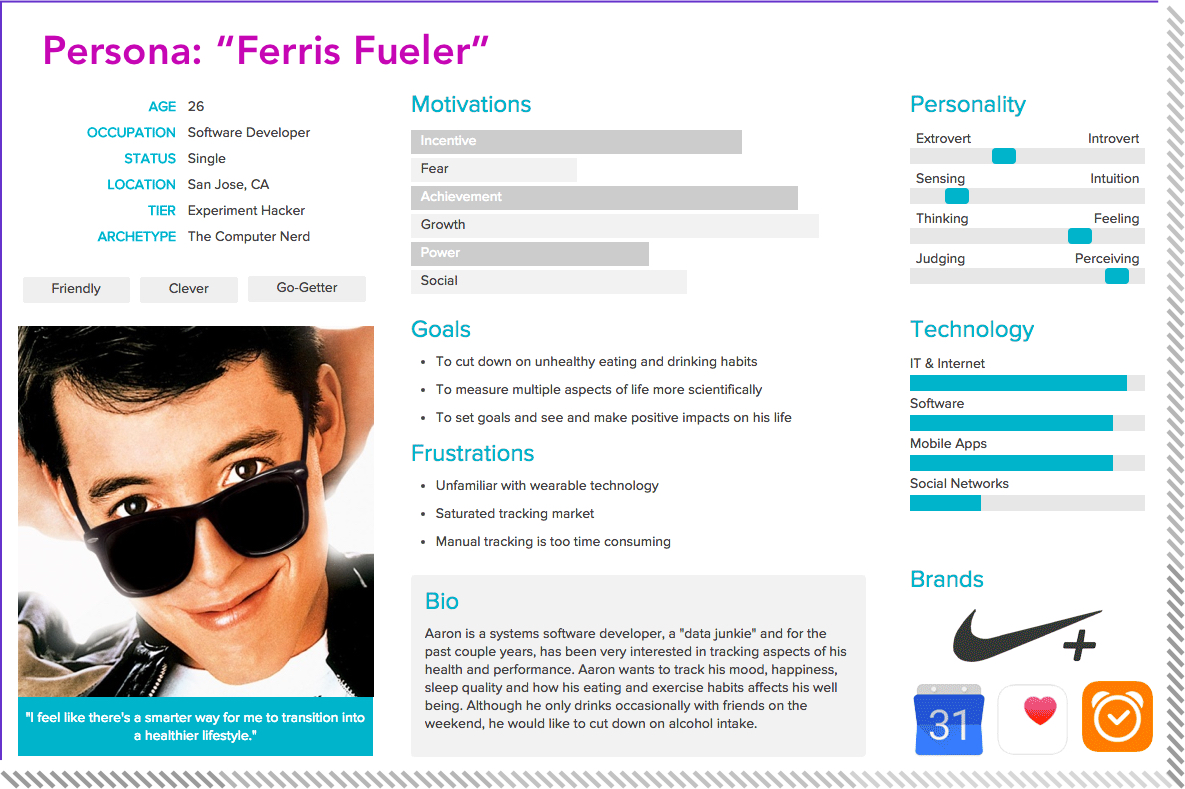
We recommend creating Personas for the primary target audiences for the product, narrowing it down to the most important 2 or 3 segments. The goal of Personas is not to represent all audiences or address all needs of the product, but instead to focus on the major needs of the most important user groups. The key aspects of a Persona include:
- Fictional name (e.g. Bobby Browser, etc.)
- Persona Group (i.e. customer segment name)
- Job title and major responsibilities
- Demographics: age, education, ethnicity, and family status
- The goals and tasks they are trying to complete using the product
- Their physical, social, and technological environment
- A quote that sums up what matters most to the persona as it relates to your product
- Photo or drawing that’s representative of their group
One last note worth mentioning is that the best type of Personas can be quantitatively measured in your product once it’s launched.
Step 3: Craft the Product Personality
The product personality will help your customers better connect with your product, because at the end of the day technology is really about people… people who build technology (i.e. your team), people who use technology (i.e. your customers), and people who sell technology (i.e. you).
Create a product personality by first reviewing the Product Vision and Personas to get inspiration. Next, imagine your product is human, and then select a specific archetype from the list below that best reflects the character you want to reflect (or develop one of your own):
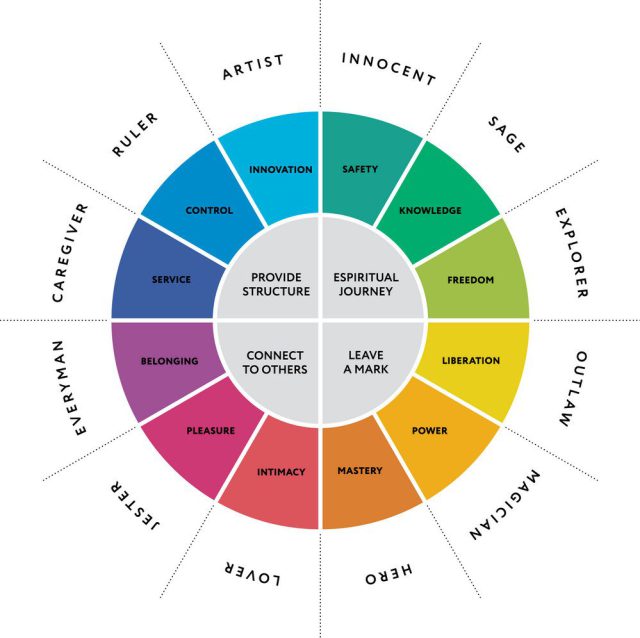
Next, choose the personality attributes that best match the archetype, where you should consider aligning one or more attributes with your Personas:
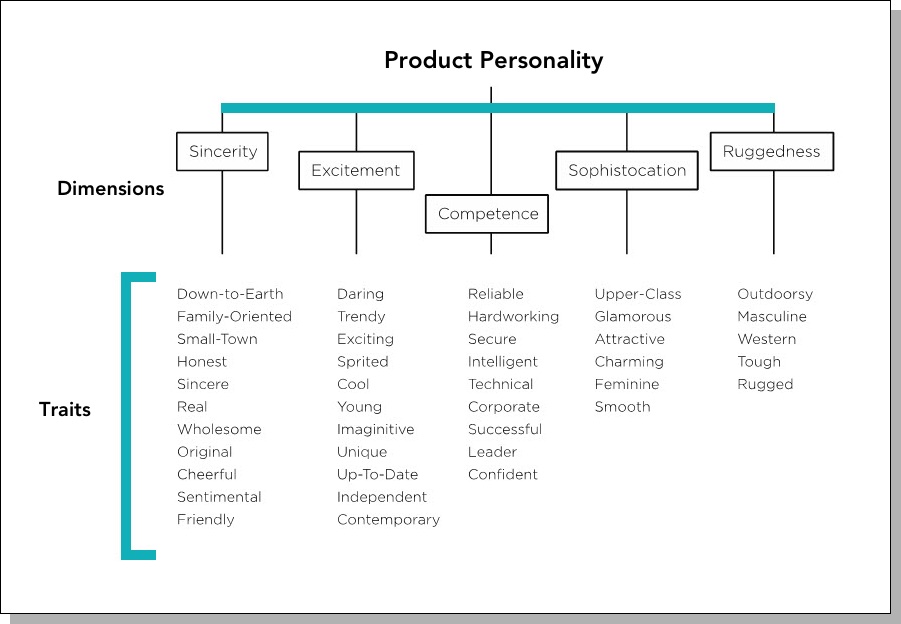
Use these guiding questions to help you narrow your attribute selections:
- What does this product represent?
- What kind of attitude does it have?
- What tone of voice does it use?
- What causes does it stand for?
- Who or what does it NOT like?
Create a list of all the personality attributes that your team comes up with, and then review each of them and resolve any conflicting attributes. Narrow the list down to the top 3-4 attributes, and prioritize them accordingly.
Step 4: Establish the Design Principles
Design Principles are first principles that guide each design decision you make as you’re working on a product, and provides the necessary focus to create a kickass aesthetic and experience that’s consistent throughout the product that your users will absolutely love. These principles will encompass all design activities, from user experience design to visual design to interaction design; however, you can create separate principles for one or more design areas if you don’t believe the design principles are specific enough to a certain area.

To get started, thoroughly review the Product Vision, Personas, and Product Personality to reveal the characteristics of the product that will drive the design, answering these questions during your research and team discussions:
- What are the primary needs of your users? Any special needs?
- What types of products do your users currently use? Are there any design principles that you can pull from those products that would fit well with your product?
- What are the typical physical, social, and technological environments that your users will utilize your product? How does design inform those environments?
- What type of information does your product display? Is it one type or different types (e.g. photos, financial, technical, news, historical, etc.)? And how much data needs to be displayed?
- Does your product encourage certain behaviors (e.g. sharing updates, buying goods, taking notes, etc.)?
Read more about the benefits of Design Principles, and also review these awesome examples of design principles from Apple, Paypal, and Airbnb if you’re still in need of inspiration.
Next, allow all team members to get involved in the brainstorming sessions and write down all of the Design Principles mentioned; there are no bad ideas in this process. Refine them based on your research and throw out any conflicting principles, as well as remove any ones that don’t align with the Product Vision. Try to narrow your list down to 5-6 of the most critical and relevant principles – although we’ve seen large complex products with 15+ design principles – and add a paragraph of supporting text to each to provide clarity to stakeholders.
Once you finalize the list, socialize them with the broader team. Reference them during meetings, design sessions, and feedback cycles to ensure the principles are being honored and used effectively. Revisit and revise the principles as necessary throughout the product lifecycle, especially every time you make a major change to the product.
Step 5: Design the Style Tile
Once you’ve completed all previous steps, it’s time to have the Creative Director and their team translate the Product Vision into a design abstraction. For this we utilize a Style Tile, which references interface elements like fontography, photography, color swatches, iconography, and patterns. If available, you can also include branding, site map, wireframes, and other user experience artifacts. Take a look at a few of my examples below.
Why not start with a mood board?
A mood board can provide a great starting point for team or client discussions, but is often too vague to make a clear leap from ideation to product. Mood boards are a good 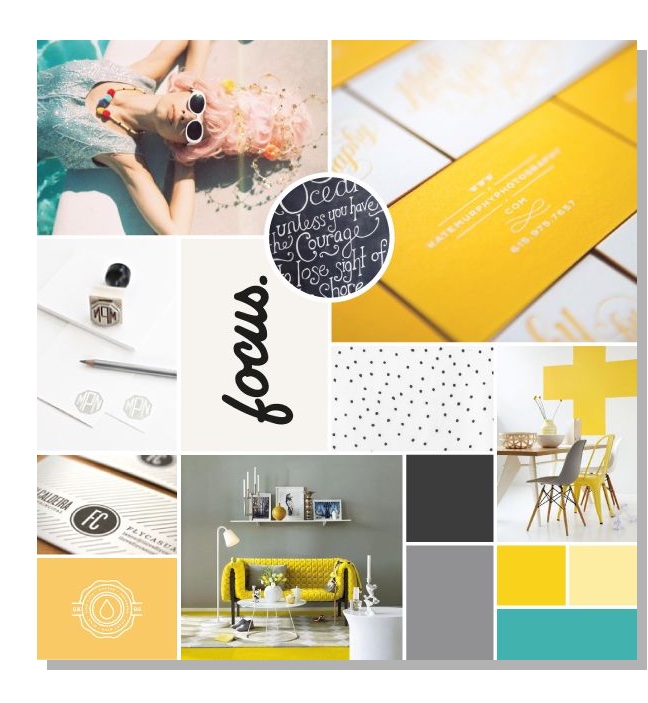 way to dig deep into a brand identity, but when it comes to developing a cohesive identity to a complex product, there can be too many – or even conflicting – elements in a mood board that make it hard for a team or client to understand and imagine the outcome. By contrast, Style Tiles are highly focused visual design artifacts that are great at helping visual and user experience designers communicate how they will apply the styles across a larger web or mobile experience. But hey, we’re all inspired in different ways. So if you want to create a mood board before you dive into Style Tiles, go ahead, knock yourself out.
And why not dive right into the development of the design style guide?
The simple answer is that Style Tiles are exploratory in nature because they’re quicker to create, lightweight, and easier to iterate and refine. You can create 2-3 design options fairly quickly, receive inputs from the team and stakeholders, and then continue to iterate further into one final option. Design style guides typically can take anywhere 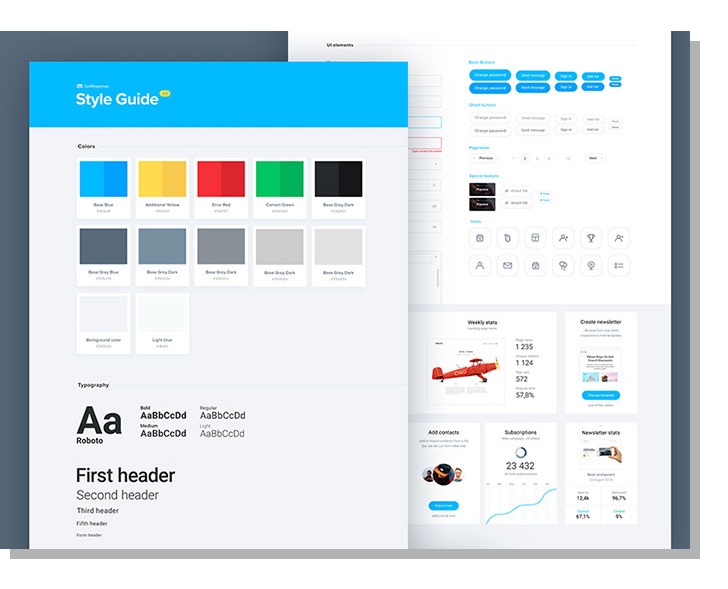 from a couple weeks to months to develop, and cover all aspects of design, branding, and the experience. Style Tiles typically only take a few days to create several options.
The Style Tile process helps to spur discussion with stakeholders on a common visual language, but we should caution that this exercise should not devolve into group think; Creative Directors should still own the creative process and ensure that final design accurately reflects the Product Vision and successfully teases out the passion behind the product and connects the team, customers, and/or client to the product.
However, we’ll note that Style Tiles are really a means to an end, not the end itself. We encourage all teams to create design style guides once the Style Tile is finalized.
Next Steps
Congrats! You should have developed a unique product personality and aesthetic using our approach, and now have a much deeper understanding of your customers’ needs and greater purpose for building your digital product. If you’re having issues with the approach, feel free to contact me for an expert consultation.
So what can I do now?
This is the beginning of the larger development effort, where you can now get started on the following tasks:
- Start Sprint 0
- Utilize the Product Vision to develop a Product Strategy
- Use the Style Tile to create a logo for the product if you don’t have one already – if you do, consider a logo redesign if you’ve developed a strikingly different Product Vision and personality than the original logo
- Use the Style Tile to begin designing mockups of the product
- Use the Style Tile to develop a design style guide that covers all aspects of the product design, branding, and experience
5 thoughts on “DSRUPTR Guide: Designing Beautiful Digital Products with a Distinctive Personality”